Thursday, December 3, 2015

Easiest cranberry sauce recipe with no added sugar

Ever since we lived in the USA my family has loved cranberry sauce and have it on our Christmas menu every year. We used to make it with a huge amount of sugar but these days we don´t eat refined sugar anymore. So I made a new great recipe. This cranberry sauce is easy to make, using just fresh cranberries, apples, cinnamon and vanilla. The later two will trick you into thinking you're eating something sweeter than you actually are.
The only downside this sauce might have for you is that the color isn´t as bright red but more pinkish.


Cranberry sauce with no added sugar


1 bag (375 grams, about 2 cups) fresh or frozen cranberries
5 jonagold apples
1 large cinnamon stick
2 vanilla beans
optional: a twig of thyme

Wash the cranberries and put them in a large pan.
Add water to the cranberries until they are just about under.
Peel and cut the apples in small pieces.
Add the apples to the cranberries.
Cut the vanilla beans in half lengthwise.
Add vanilla, cinnamon and thyme if using to the cranberries.

Heat the cranberries until boiling.
Reduce heat to low and let boil for 10-15 minutes.

Remove thyme, vanilla bean and cinnamon stick.
Mash the cranberries and apples together.

All done!

If you find the cranberry sauce to still be too sour, you can add a tablespoon of sweetener of choice. I recommend either agave or maple syrup.

If you are not eating the sauce immediately, pour into (sterilized) glass jar and add the cinnamon stick again.

Is cranberry sauce a tradition at your house too? How do you like to make it?


Saturday, November 28, 2015

How to cure hiccups fast and easy everytime

My family learned this trick to cure hiccups over 20 years ago but somehow the word never spread. It's ridiculously easy and works every time. I'm not kidding.
When you first read this you will probably think it's a joke. If so, try it anyway. Hiccuping doesn't make you look sophisticated either so what have you got to loose?
http://www.motherearthliving.com/~/media/Images/MEL/Editorial/Blogs/Natural%20Health/How%20to%20Get%20Rid%20of%20Hiccups%20with%20Herbs/cure%20hiccups%20logo
No more hiccups!
Step 1. Grab a glass of water or better yet a bottle that you can pick up with your teeth. 

Step 2. Plug your ears and nose. Easiest done by putting your thumbs in your ears and your fingers on your nose. 

Step 3. While keeping your nose and ears plugged drink at least half a glass of water. (It can work with just a mouthful of water but isn't as foolproof.) 
If you are by yourself and don't have a bottle, it is possible to pick the glass up with your little pinkies. Otherwise get someone to help you. 

Step 4.  Victory dance! 

(If it doesn't work, you probably didn't swallow often enough. Just try again with a bit more water. )

I don't remember where we learned this and have no idea why it works but it does so enjoy a hiccup free life!

Monday, November 23, 2015

Marzipan recipe with agave

Who doesn't love marzipan?!! Sinterklaas (Saint Nicolas) is back in the Netherlands so it's time for sweets, sweets and more sweets. Marzipan usually comes in sausage form, or as figurines. I made this one as a roll covered in chocolate. It's gone before anyone saw what it was anyway! It took me a little while to get a sweetener that gave the marzipan the right taste. I see a lot of recipes for marzipan with honey but I think the honey has too much of a distinguished taste to use in this case. I have found that agave is the best replacement for white sugar when taste is an issue.

Easy to make, easy to eat!

Marzipan with agave

Makes me want to stop writing this blog and go and make some!

150 grams (1 3/4 cups) almond flour 
100 gram (1/2 cup) light agave syrup
1 teaspoon almond extract
plastic wrap
optional: a bar of good quality dark chocolate and waxed paper

Mix the flour, agave and almond.

Yay you just made marzipan!

Scoop the marzipan onto a piece of plastic wrap. Use the wrap to make a roll, wrap it tightly.
Put the marzipan in the fridge overnight.

Now you can either eat as is, or coat it with chocolate like I did.

To do this put the marzipan in the freezer.
Cut a piece of waxed paper the size of a plate and put it on one.

Melt your bar of chocolate in a bowl over a pan of simmering water. Don't let the bowl touch the water.
Just before it has melted completely, take the bowl off of the pan and let stand on the counter.

Put a piece of waxed paper on a baking tray.
Stir the chocolate gently to see if everything has melted. If not let stand for a few more minutes.
Pour the chocolate onto the baking tray.

Take the marzipan out of the freezer, remove the plastic wrap and push a fork in on either side.
Use the forks to roll the marzipan through the chocolate.
Put the marzipan on your waxed paper covered plate.

Keep the marzipan in the fridge until needed.
Remove it one hour before serving.
Cut in slices with a sharp knife.

Enjoy!


(Note: I'm not sure if agave can be called unrefined or natural as it's not found quite like this in nature but goes through a process. A look on the web gives lots of contradictory articles about the (un)healthy aspects of agave. As far as I can tell agave is high in fructose, low in glucose. This makes it low on the Glycemic Index, meaning it doesn't spike your blood sugar levels. However it does have effects on blood sugar and insulin levels in the long term. Also some agave nectar or syrup is made by a chemical process. This doesn't make it any healthier. Always read the back of the packaging to be sure. 
My opinion: Don't use agave on a daily basis or often in large quantities. Remember that every sugar is crap for your body. Try not to eat too much of it, enjoy it intensely when you do and eat more vegetables!)

Any thoughts on agave? Do you use it?


Sunday, October 18, 2015

Amaranth pancake recipe, gluten free, no sugar, no dairy, candida diet approved

This is an awesome pancake recipe, gluten free, sugar free, lactose free (optional), candida diet approved and really yummy. Combine with veggies and eggs and you have a great dinner!

Last Saturday I took a small course in food photography. It was really fun and useful. Sadly I couldn't use the tips right away which means you still have to do with the awful pictures seen below, giggle.

I also started the Candida diet about a month ago. I did the no sugar, no lactose, no gluten, no carbs.... The first week I was ok, the second week I felt like throwing everything within reach against the wall (except my kids of course, they kept me sane enough to function), and the third week I was feeling so much better that I started eating normally again. I still eat a lot of veggies and try to keep the sugar to a minimum. 
So hereby a nice healthy candida diet recipe. The pancakes have a nice nutty taste and work really well with veggies and eggs. No need for maple syrup on these :)

Amaranth pancakes with veggies and eggs

(Makes about 8 pancakes)
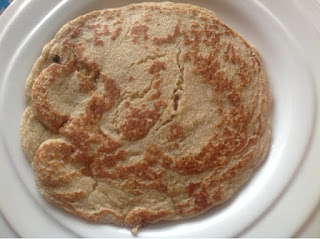
The steam coming off the food made the picture blurry... 
I love my coffee grinder, so versatile
Amaranth flour
First we need amaranth flour. This is easily made with a coffee grinder. I use a Krups Spice and Coffee grinder. Works really well and doesn't cost much, just 17 dollar! One tip: buy a little brush to get everything out.
 Just a few seconds of grinding is enough to turn the amaranth into flour. The amaranth that didn't get chopped will make for a nice crunch in your pancake!

Pancake ingredients

1 cup amaranth flour
1 cup buttermilk or almond milk (other milk is fine too)
1 egg
1/2 teaspoon baking soda when using buttermilk or 1 teaspoon baking powder for other types of milk


Mix baking soda/baking powder with flour. Add milk and egg, mix well. 
The batter will be quite thick but don't be tempted to add a lot of water. One or two tablespoons of water will make it a little bit more fluid without it getting impossible to flip the pancakes.

Bake small pancakes, add some (green) veggies (I used zucchini, broccoli and some carrots) and some scrambled eggs. 

Looks just like a normal pancake :)

My kids loved this!

Looking for more pancake inspiration? How about these Healthy American pancakes or these classic Dutch pancakes.

Have you cooked with amaranth before? Any other good recipes I should try?

Monday, July 13, 2015

Easy quick healthy ice cream, sugar free, no egg, no dairy

With the first heat wave already behind us, get yourself ready for the next one with this great healthy ice cream recipe. It tastes delicious and with just 2 base ingredients you can make a lot of flavors. It takes about 5 minutes to make with a food processor and can be eaten immediately which is a great plus when you have kids! Of course you can have more ice cream!


I've included three different flavors but you can experiment when you understand the basics.

Healthy ice cream

Chocolate ice cream
Ingredients:
2 ripe bananas
2 tablespoons unsweetened cocoa
1/2 cup frozen blue berries

Forest fruit ice cream
Ingredients:
1 ripe banana
1 tablespoon unsweetened cocoa
250 grams (about 1,5 cups) frozen forest fruit

Mango ice cream
Ingredients:
2 ripe bananas
250 grams (about 1,5 cups) frozen mango pieces

Mix the bananas and cocoa if using, in a food processor until the banana resembles a liquid. 
Add the frozen fruit a handful at a time and mix until completely smooth.
(Be sure to use a device that can handle frozen fruit. I broke my little mixer thing.)

That's it! You can eat your yummy healthy ice cream now!

If you feel your ice cream is too runny, pop it in the freezer for 30 minutes. Give it a good stir and repeat as needed.

Making ice cream really is this easy!

Tips to make your own creations:
-As you can see I use a ripe banana as a base. Be sure to use a ripe but not overripe banana. The taste will be too strong. (Unless of course you want to make banana ice cream, then an overripe banana will be even better)
- Don't use big pieces of frozen fruit unless you are sure your device can handle it. Adding a handful at a time will help small devices handle the stress.
- Experiment by adding pieces of chocolate and nuts. I recommend grinding these down separately and stirring them in at the end.

So what ice cream are you thinking of making? I would love to hear!

Friday, May 22, 2015

Want to come to Disney World with me?

It should come as no surprise to anyone who has read this blog that I love Disney World. It's right up there with the entire rocky mountain range (especially Canada and Boulder, Colorado. I would have loved to study there!) Luckily my hubby also likes both! The only thing holding us back is a lack of money. That might change if my blogs started earning dollars a day instead of pennies. Click a banner! go on, no pressure ;) (Kidding aside, I'm grateful to all of you who read this blog and I do not do this for money.) 

Though Disneyland Paris is just a 6 hour drive away, it is very expensive. In part because they put it right next to Paris. Once in a while I check how much it would cost and it always seems that just a few days Disney Paris is just as expensive as two weeks Florida! Excluding transportation costs. I always end up choosing to save for a big trip to Florida, even if it is years away, than spend it on a few days Paris.
 
You can imagine how excited I get when Disney turns on their webcam. They do this for special events and the one I like best is the 24 hour event they started having annually. It's going on right now so check it out:

A great view of Disneyland, though a little small on my iphone... Tiny people :D

http://www.disneylandevent.com   
This will get you no less than 6! Webcams in Disneyland California

http://disneyparks.disney.go.com/blog/watch-coolest-summer-ever-live-stream-main-street-u-s-a-at-magic-kingdom-park/   
This is Floridas webcam, it is not as good as those from California but you can watch the parades and fireworks really well with this one! 

Want to know when to watch the Florida cam, check this site for the scedule:
http://www.wdwmagic.com/events/coolest-summer-ever/news/20may2015-entertainment-and-attraction-operating-schedules-for-the-24-hour-'coolest-summer-ever'-event-at-the-magic-kingdom.htm

Wishes is awesome, as are the parades.

And the best part this year: the cams how sound now! Yay! You can hear the hustle and bustle of the theme park and all the beautiful music.

Have fun!!


Thursday, May 21, 2015

Willow tree wedding cake and Scottish Outlander birthday cake

It's been busy lately and here are the results:

'All we need is love, and a little cake' wedding cake

This is a wedding cake I made for friends. I had to make it bigger than we agreed upon of course, which was quite challenging considering I was also their master of ceremonies (at least that's what they call it here. It might be more comparable to maid of honor duties.).
I also made some sugar flowers, you can almost see one at the bottom

This 5 tier cake has two flavors. The dark tiers are chocolate cake with mocha butter cream. I used chocolate ganache to crumb coat and the outer layer is a poured on chocolate gelatin.
The top tier has the outline of Austrian mountains painted on it with royal icing. I did this to correspond with their wedding rings. They incorporated the design because they look out on these mountains from the apartment they rent when they go on ski vacation, which incidentally is also where he proposed!
Setting up a cake in formal dress hahaha

The off white colored tiers are white chocolate cake with a champagne butter cream. It's also crumb coated with chocolate ganache and covered with natural marzipan (so no color added). The flowers/lace type design was made with royal icing.
A little girl helped me decorate, she is standing just off camera but she was so sweet!

The bride asked to have "All you need is love, and a little cake" added to the cake, maybe as a topper as she didn't want one of those traditional ones. I on the other hand had a (in my opinion) much better idea. I really love Willow Tree figurines and while getting inspiration for a sculpture I wanted (more on that some other time) I noticed they have cake toppers. They have a few but this one resembled the bride and groom the most and I loved the design. The figures are really intimate but actually only touch in three places and you can look at it from any angle giving "...a different understanding of their shared feelings". The fact that you can look at it from any angle makes it nice for a cake because it means you can photograph from any angle and the topper will still be awesome! 
The great thing about this topper is, they can put the figurine somewhere in their house and it will look gorgeous, which is why this was my gift for them.
(FYI: the topper is called Around You, by Willow Tree. It's tested to ensure food safety and comes with a little piece of plastic to put between the topper and the cake as the topper is not waterproof.)
Willow Tree on the mountain

I did add the phrase to the cake, but decided it would fit better in the theme to make it say "All we need is love" and to add the "And a little cake" on the base plate. It's funny but I really didn't want that to be too obvious. The fruit was also on request. There was supposed to be more of it, but I didn't have much time on location to set up the cake so I couldn't try it out.

Anyway, I thought the cake turned out awesome! It looked exactly how I envisioned it, no big problems and the bride and groom were happy. Good enough for me ;)

So on to the next one.

a Scottish/Outlander themed birthday cake


It was a bit too green but I loved how it turned out
The lady who ordered this wanted a Scottish/Outlander themed cake for her birthday. She wanted a stone circle, thistles and tartan, and the cake was only for 6 to 7 people! That's small!
I decided to make the thistles life size and use a base board to put them on. That way the circle wouldn't be cluttered. I made little tufts of grass and put tiny points of purple on them to represent tiny thistles. You can't even see it in the pictures but it really made a difference, just a little pop of color near the circles!

The thistles were fun to make
I wasn't too impressed by the tartan printed on frosty sheet. It was hard to handle and had been printed a bit too dark (in the pictures it looks lighter than it did in real life). I still liked the way it turned out though.
There was also a request to add a phrase on the cake. I'm presuming it's Scottish though the online translator didn't understand it. It basically said Happy Birthday Anna!
The tartan was a bit dark and hard to handle on frosty sheet.
It was a fun cake to make. On request it was a coconut cake with a pineapple butter cream filling. I crumb coated with chocolate ganache because I had a long drive and I don't have air condition. It's covered with marzipan but the rocks are fondant and the piped on grass is butter cream.

The client loved the cake so that was awesome! I hope she noticed I made the stone circle like the one on Outlander! I might have to mail her just to ask :)

Now on to my Dad's birthday cakes! They are going to be fun :D

So what do you think? Is the wedding cake extravagant enough? Did you recognize the rocks as those from Outlander?


Thursday, May 7, 2015

Gluten free chocolate chip cookies, no egg either

These gluten free chewy cookies also contain no egg and very little ingredients. They do not last long in our house and are great for unexpected company because they are so quick and easy to make!

Gluten free chocolate chip cookies

Makes about 12 medium cookies

Ingredients

300 grams (3 cups) almond flour
90 grams (6 tbs) butter, room temperature
5 medjool dates, pitted
4 handfuls of chocolate chips

Preheat the oven to 180 degrees C (350 F)
Put a piece of wax paper on a tray.

Mix flour, butter and dates in a food processor until no big pieces of dates remain.
Add up to 5 tablespoons water, one at a time, until the dough starts to form a ball.
Add the chocolate chips (you can add as little or many as you like which is why I didn't give a clear amount)
Mix the dough by hand until the chips are well spread.

Roll small balls from the dough, about the size of a golf ball.
Put them on the tray, pressing them down to about 1 cm (1/3 inch) thickness.
Keep in mind that these cookies do not spread or rise. What you make on the tray is what they are going to look like after you baked them.

Put the tray in the center of the oven (or if you can't put it in the center because you have a stupid oven just like me, put it above the center, not below).
Bake the cookies for 10 minutes.
Let them cool on the tray.

Try not to burn your tongue! (I always do, they are just too yummy to wait for them to cool!)

Let me know what you think!


Wednesday, February 11, 2015

Healthy apple crumble, no added sugar, no gluten

My toddler is always asking for cookies. No idea why, because we never have any. On those occasions when she gets really pushy, I try to make something yummy and healthy like this apple crumble.
The apples are obviously just apples. The crumble is a bunch of raw super food (at least that is what they are calling it here) tied together with real butter.
It's really good and leftovers are great for breakfast, mixed with some yoghurt.

(Be sure to buy products that are truly gluten free if this is important. Products like oatmeal are of themselves gluten free but the machines they are processed on are often not. Check the package to be sure!)

Healthy apple crumble

Makes 4 to 6 servings

Ingredients

8 or more sweet apples
2 tablespoons cocoa nibs
2 tablespoons hemp seed
2 tablespoons flax seed
5 tablespoons oatmeal
1/2 teaspoon salt
5 gooey dates 
2 to 3 tablespoons butter

Preheat the oven to 190 degrees Celsius (375 fahrenheit)
Take a small baking dish and butter the inside.
Cut the apples into cubes and distribute them over the dish.

Mix the dry ingredients (no dates) in a food processor until it turns into a flour like substance.
Put the dates in and mix well.
Add the butter until it just starts to clump.

Mix the crumble by hand until you have nice size clumps.
Distribute the crumble over the apples.
Bake for 20 minutes then add a loosely tented foil over the top.
Bake for another 40 minutes or until apples are soft and just a bit mushy.


Tuesday, January 13, 2015

Dutch split pea soup recipe also called snert

Snert is a split pea soup closely linked to weather conditions. We eat the soup when it's 'snert weather' usually meaning wintry cold and wet either in the form of snow or in most cases rain. When iceskating in the Netherlands, snert is never far away (look for Koek-en-Zopie stalls on or near the ice).
The soup is very thick and best made in large quantities the day before you plan to eat it. As the soup pan can be quite big, put a lid on it and keep it in the shed or garage (assuming that it's cold of course).

It takes a while to make but not much effort. Give it a try, it's really good!

Dutch split pea soup

Makes enough for at least 6 people,
if that's too much you can easily half the recipe

Snert! One of the thickest soups you'll ever eat.


Ingredients:
900 grams (4 cups) split peas
2 medium sized leeks
2 medium onions
2 wintercarrots (at least that is what they are called here, it's the thick dense type)
1/2 celeriac
5 stems of celery leaves
2 laurel leaves
1 kilo (about 2 pounds) pork belly
2 smoked sausages 
salt and pepper


Put four liters (a gallon) of water in a large soup pan. Add the pork belly and pour the peas on top of it. Also add the laurel leaves. Bring to a boil.

After about ten minutes of boiling on medium heat, scoop the froth off.
Boil on the lowest heat possible for an hour. Give it a good stir once in a while.

In the meantime, roughly cut the leeks, onions, carrots, celeriac and celery.

After the hour remove the pork and cut into cubes. Also remove the laurel leaves.
Add the pork and vegetables and cook the soup another 30 minutes. Stir sporadically.

Season the soup with pepper and salt (unless the pork belly was salted, then do not add any more).
Slice the smoked sausages and add to the soup 5 minutes before the timer goes off.

Leave the soup to settle overnight. If your wooden spoon can stand upright in it the next morning, you did it perfectly! :)

Serve hot with rye bread topped with smoked bacon or cheese.

The soup will keep in the fridge for a couple of days but you can also freeze it really well.

Enjoy!


Friday, January 9, 2015

Multitasking with awesomeness

The ultimate multitask: blogging while feeding a baby, cooking pea soup and melting coconut oil. Who doesn't love feeding pillows, without it I would be on the couch watching tv. (Which isn't too bad accept that the mediabox keeps getting stuck so I can only watch one channel.)

And that is...if the toddler isn't home.

When they are easiest but least funny

I must say whoever said babies are hard obviously does not have a toddler running around! When I had my first daughter I thought I didn't have time for anything. I felt like a cow (you know, the ones that give milk) and
Related Posts Plugin for WordPress, Blogger...