Friday, October 28, 2011

DIY Mickey Mouse 2D plushie including free pattern

Have you ever looked at a Pook-a-looz and thought: "Geez those are big!" as well as "That looks easy enough to make" ? Well you won't have to google it because I'll show you how.

Here's the original by Disney which I secretly would have loved to buy if they had sold them outside of the USA, which they do not...
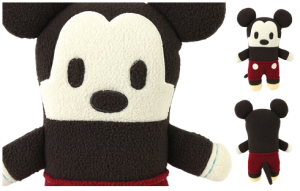


And here's my version:


I put him next to a Wii remote just to show the size. He's quite tiny, but very cute. He did turn out a little less wide than I would have liked, meaning he's kinda skinny :) I changed this in the pattern, as well as making his legs a little shorter.

I have never actually held a real Pook in my hands because, like I said, they do not sell them anywhere except the USA, not even Canada where I had the fortune of being three months of this year. But looking at the Disneystore.com page I found that they are made from stylized soft fleece, whatever that means. I decided to make mine from felt, because it's cheap, easy to work with and you don't have to buy it meters/yards at a time. The felt works well I think, but if you want to make this for a baby or small child I would recommend fleece as it's softer.

I sewed the entire thing by hand, which took a surprisingly short time. All in all I spent about 4 hours on Mickey, while watching television.

Making your Mickey

Needed:
- The pattern which you can print out below
- sheets of real woolfelt or pieces cuddle fleece, in colors: black, red, yellow, white
- needle and black thread (you will be hand sewing this)
- pins
- a printer


First you want to download and print the pattern:  2D Mickey Plushie pattern  It's free, so feel free to spread it around but I would appreciate it if you mentioned my blog.

The pattern is pretty easy. You can cut out all the pieces on the black lines and transfer them straight to the pieces of felt, I already took seams into account. The green lines are just to show where the different pieces go so do not cut on these!

UPDATE: It is easier to cut out a full black body and sew the pants onto it. To do this: cut out the pants first (keep all the seams because they will need to be a little bigger to cover the body), then just paste the parts of the pattern together overlapping the GREEN lines and cut out a full body piece.
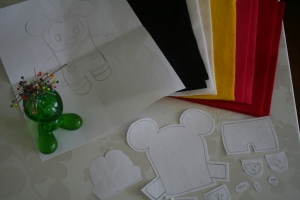
You will also need felt, one sheet of each color. I bought  these at Michaels but you can get them at any store that sells craft stuff, like walmart. You will need the colors black, white, yellow and red.You might want to buy two pieces of black, just in case you mess up.

Update: I just learned from mmmcrafts (see links) that for plushies it's better to use real wool felt, not this synthetic stuff. When hugging the plush a lot it will shed and get pieces of fluff on it. Mmmcrafts can tell you where to buy these (see FAQ). You can also use cuddle fleece.

In the picture there's also pink because I'm planning on making a Minnie Mouse too, which I'll post when I have it.

Other needed supplies: Pins, a thin needle, a bit of plushie filling and sturdy black thread. I used thread for jeans because it's thicker and makes for a nice decorative seam.

So go ahead and cut out all your pieces. You will also need to cut a tail but I'll show you that later.

I assembled the pieces on another piece of felt. This way you don't lose anything and you know where everything goes.

Now take your needle and start sewing one side of Mickey (meaning either all the front or all the back pieces) together by whip stitch. (If you have no idea how to do this, here is a great tutorial.)  When joining these parts together I stitched back and forth as shown below to create a sturdier seam. You do not necessarily have to do this. After stitching together one half of Mickey, do the same with the other half. Leave the face, tail and buttons for later. Right now you should have two halves of Mickey that are mirror images of each other (though they'll look about the same).

Position the face, eyes and nose on one half of Mickey. When you are satisfied with the look, pin the nose and eyes on the face. Then stitch them on the face. I chose to do a decorative stitch because I think it looks cute but you can sew them on with a different stitch if you like. Beware though that if you used black thread for all the seams, you will see this after you turned mickey right side out and you'll have a decorative stitch along all the seams.
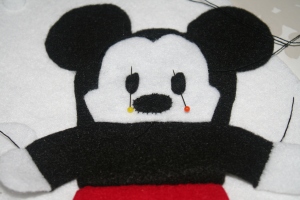
When you stitched on the nose and eyes, stitch the entire face on the head (beware you stitch it on the right side! You don't want to turn Mickey later, to find that the face is now on the inside of your plushie.)

Sew the buttons on the pants in the same way and on the same half of Mickey that also has a face.

Now you'll need to make a tail. This is really easy. Just cut out a long stumped triangle and sew it on the pants of the other half of Mickey. For a tail example see the picture below. I didn't put this in the pattern because you might want to make the tail smaller or bigger or wider or thinner, whatever meets your fancy. You can also stitch it on differently, pointing down or up, or diagonal. I kind of liked being able to see a piece of the tail from the front.


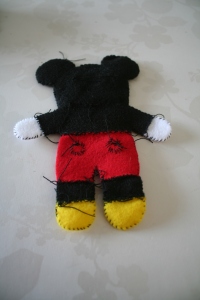
So now your Mickey is almost done except that he's laying in two pieces. Whip stitch these right side together with just one row of stitching (so do not go back and forth here) but leave one side of the pants open for turning.

Carefully turn Mickey right side out, taking care to shape his hands, shoes and especially his ears. The one row of stitching should be visible making it a nice decorative stitching. I think it looks really cute when it's not perfect stitching but again, that's up to you.

The only thing left to do now is fill Mickey with some fluff. Be careful not to fill him too much, because then he won't be 2D anymore. You'll want to keep him kind of flat. When you are satisfied close the pants seam with whip stitch. When you're done you can use a pin to push the felt under the stitches towards the inside so it will look the same as the other seams.


All done! Yay!

Did you make a Mickey? How did you do? I would love to hear about it!

Update: My niece really loved this Mickey. She carried it around Disney World for an entire day (until her mommy bought her a minnie mouse plush...:) )

Tuesday, October 18, 2011

Sometimes tiny simple things make you happy and sometimes tiny simplethings make you sort of sad.

Sometimes tiny simple things make you happy and sometimes tiny simple things make you sort of sad. Take Pinterest.com for instance, that is a really neat site. Super easy (except for the waiting list to join) and really useful. Type in what you're looking for, like Baby Gift for inspiration on things to give a newborn, and tada, you get all these pictures of things other people have found extremely fun without having to go through lists of google junk. Check it out if you don't know it, I didn't.

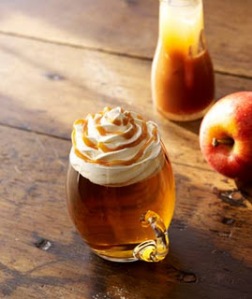
While I was happily searching away on Pinterest, going to more and more interesting blogs by normal people (such fun!), I came across A Law Student's Journey, about the Journey a Law student makes during her three years of study (obviously). She used to work at Starbucks and decided to give all readers an insight into the workings of those apparently evil minded employees of the coffee place of my choice, which is hilarious, as well as giving the recipe for Carmel Apple Spice (shouldn't that be Caramel by the way? Or is it the same thing.) I really like Christmas Holiday drinks and got really excited about the prospect of learning from the Starbucks masters.... but it's really disappointing!

Just looking at the picture you think Yum!


But then you see the recipe: Take apple juice, put in Cinnamon Dolce Syrup which you bought at Starbucks and heat in the microwave. After which you put on some whipped cream and take your bottle of caramel sauce and drizzle some over the top. Easy peazy so probably fabulous for all those who don't want to spend time in the kitchen, but really artificial for all others. And the sad part is mostly that it's really expensive at Starbucks and doesn't even really contain caramel or cider in the actual drink part of the drink!

So, having made this type of drink a few times myself, not completely from scratch but more so than the Starbucks variant, here is what I would do:

Take a liter (about 4 cups) of apple juice or apple cider (or cranberry juice, that's also really yummy for this), put in sauce pan together with a quarter lemon with 2 cloves pushed in (that's so you can easily take those out when done), a cinnamon stick and 3 juniper berries. You can add a little nutmeg too if you want, powder should do ok if you don't feel like grating. Bring that to a boil, on lowest heat leave to steep for about 20 minutes.

When done, take out all the spices and pour into cups. Then take your caramel sauce because face it, you do not want to be making your own. It's a hassle and can go very wrong. Pour some into the spiced apple juice/cider and stir, than add whipped cream and drizzle some more caramel over the top.

This is also super easy to make and will cost you less than getting a Cinnamon Dolce syrup bottle from your local Starbucks. Plus you get that wonderful smell of steeping apple juice/cider throughout your house, giving you a very homey feeling ;)


Monday, October 3, 2011

Making a raincoat...

Raincoats are boring.

And so I have decided to make my own. I've bought some oilcloth from Ikea and am now trying to figure out how to make the seams water tight. Pretty important for a raincoat. There is probably lots of info on making raincoats but I'm too lazy to google it so I'm just going to wing it. Awesome :)


I did read eHow.com which was a little helpful, but doesn't say anything about seams. Anyway, I made a sketch of what I want it to look like:


Now I'm going to find a pattern for a coat that matches my idea of what this coat should look like.

My plan is to post the project with pictures to show how I did it. And then it's hoping that the coat will actually be water tight because otherwise all those posts will be useless ;)

UPDATE: there's only one extra post about my successful making of this raincoat :)You can find it here.

Saturday, October 1, 2011

Spare time

I read books, lots of books, even when I really don't have time to read books like when I was writing my master thesis and it had to be finished within a month, I still read books. And I don't mean literature.
Right now I'm reading two books at once. The book of awesome and a book about Adventures in the American suburbs. While I mostly find it annoying to read multiple books at a time, because it doesn't do any of them justice, this combination is rather interesting. The book of awesome tells about all those little things in life that make you really happy, like bubble wrap and rain on hot pavement. The Adventures in the suburbs focuses mainly on dramatizing rather off the point aspects of American culture, making them look absolutely awful, like not staying for a glass of wine when picking up your kid from a play date and play dates in general. While the first makes me appreciate life and laugh about little things that are absolutely true but don't often come up in your brain, like playing in old playgrounds, before everything was cushioned. The latter makes me irritated to even be reading a book like that and is cultivating a small internal hate for the writer while bringing a smile to my face because some things are just absurd. The difference here lies not so much with my own interpretation as with the two writers. While The Book of Awesome is written by an upbeat Canadian, as my chiropractor once put it: a decaffeinated American, that other book is written by one of those down casting Dutchmen. It shows exactly why those cultures are opposites and I love and hate both. (Mind you, I get to because I grew up in both.) I'd rather be upbeat and love to focus on those little things, but a good sarcastic joke can go a long way too!

Friday, September 30, 2011

How original...

So, random things... that has got to be the most unoriginal blog theme ever. But as I do not have a current interesting blog theme, this will just have to be it for now. Maybe along the way I'll find one that suits me, or potential readers and I'll change the name.

My blogging efforts started ages ago, when I did have a theme: my family vacation to Disney world in December 2011, but as such things go I forgot and having just checked, my last post was march 2010. Nice... Don't even try to find it because I hid it. Not only to hide my embarrassment but mostly because the world (whether it be online or off) does not need more places that store information about the Vacation Kingdom! There are so many sites, blogs, books, dvd's and just plain people that can tell you this information that it's useless to write it again.If you are intrigued to find some, google away! Or go to my favorite sites: touringplans.com; allears.net; and the disney mom's panel. Disneyworld.com actually tells you a lot too, who would figure that, right?!

So random things it will be. The first one being that I just wrote my first job application letter with pretty resume. Yay! I'm officially unemployed. No longer a sweet student, but business women. Though I have no job, so really I'm just a bum. But writing letters so yay!

Maybe that should be my theme, that which everyone who has a job somehow wants to relate to a person that just graduated university: "Now your real life starts!" Which begs the question: what was I living before? My fake life?

This would be suggesting that I have not been living it properly since I was born. I cannot help it that our society dictates that we learn stuff and so we learn that learning is good and so when we get to make our first life altering decision we go off to learn some more. Which is exactly what everyone said I should be doing, because that would eventually lead to better job perspectives, and in conclusion we must then conclude: a better real life.


Alright I got my theme here: the better real life it is. So if you didn't understand this at all here are the Cliff's notes: My blog started out being called Random things, and it took just one entry to find what my purpose should actually be, though I can assure you it will still contain many seemingly random things ;)
Related Posts Plugin for WordPress, Blogger...